> ## Documentation Index
> Fetch the complete documentation index at: https://docs.sigmamind.ai/llms.txt
> Use this file to discover all available pages before exploring further.
# How to Add New Tool
Tool actions define what operation the AI agent can perform using the API.
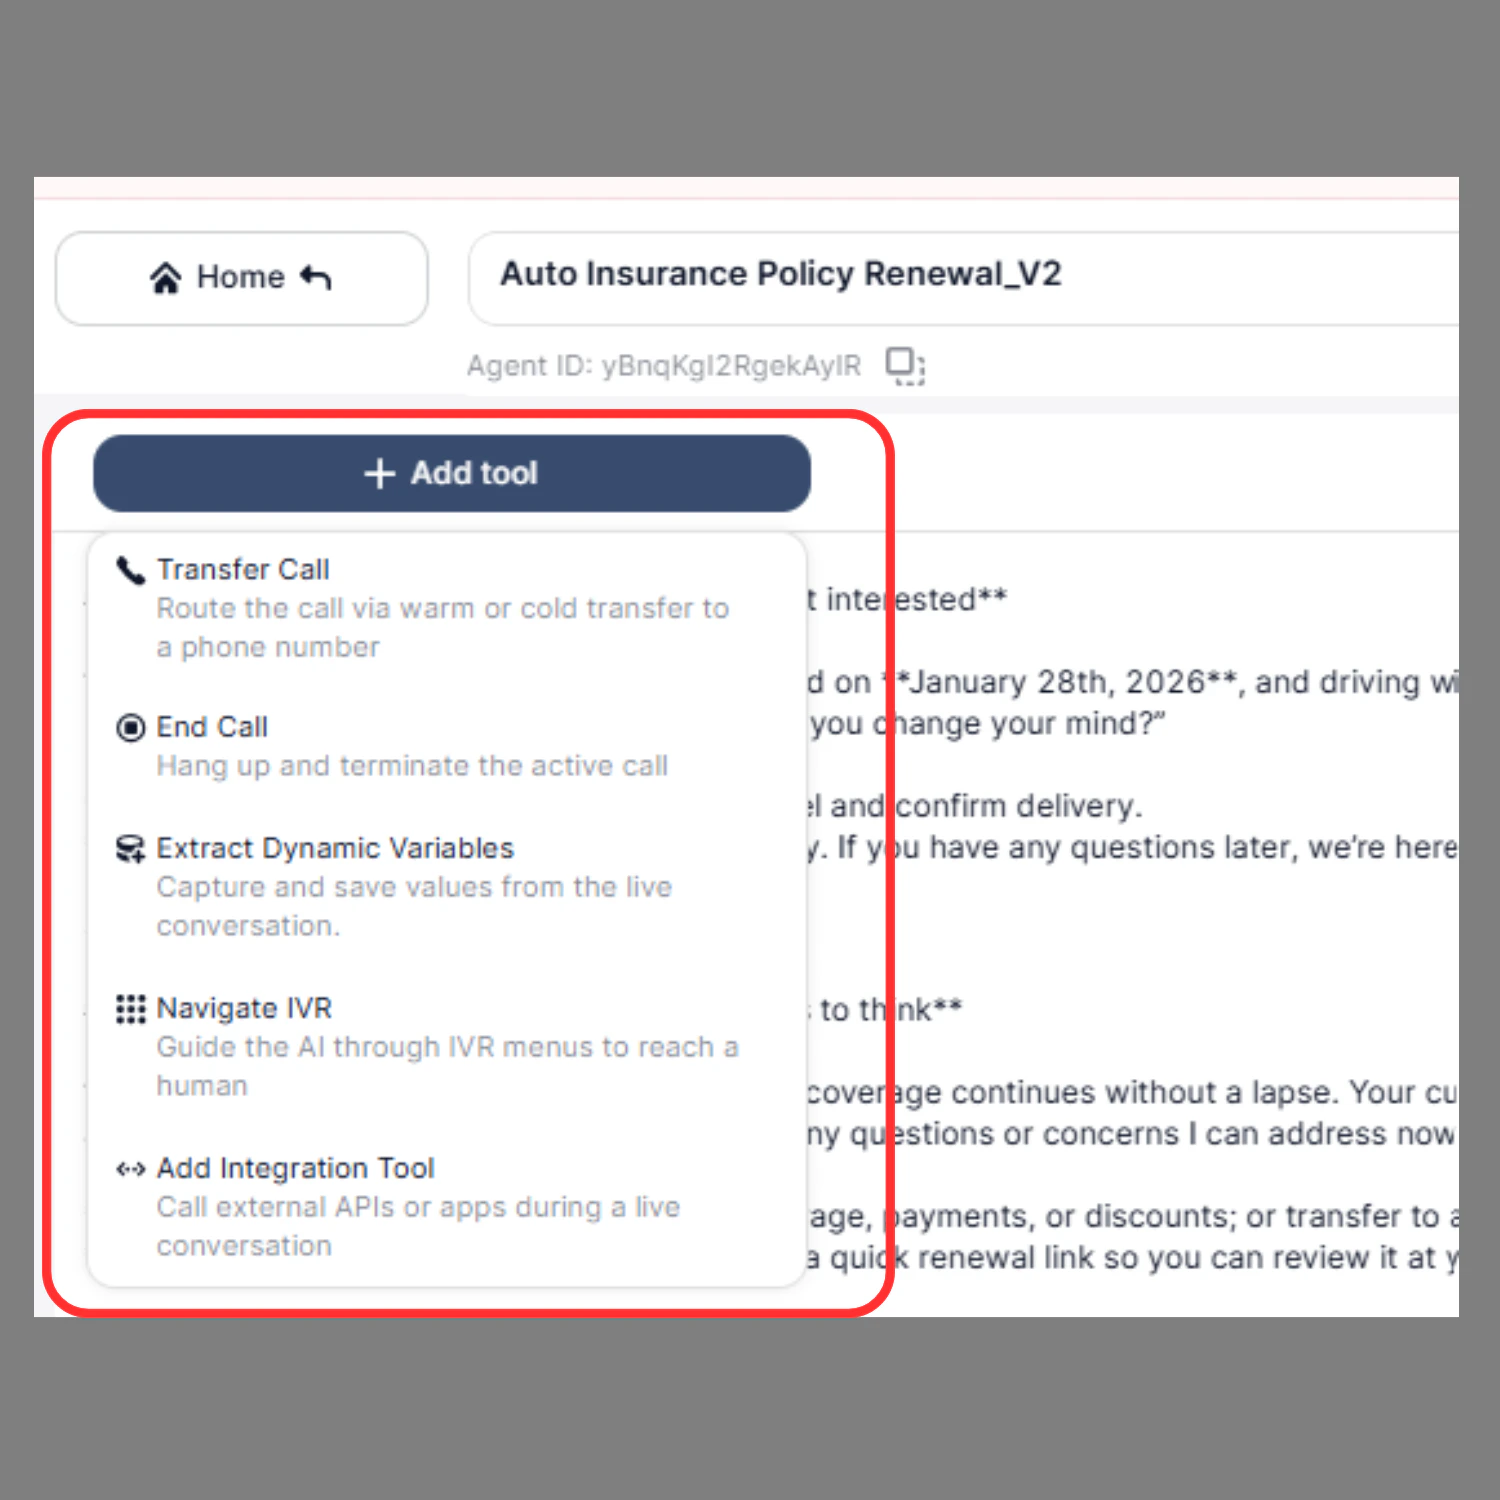 ### Steps:
1. Click on **Add New Tool**
2. Enter the following details:
| Field | Description |
| :-------------------- | :-------------------------------------------- |
| Action Name | Name of the action (e.g., Reschedule Booking) |
| Description(Optional) | What the action does |
| Endpoint URL | API endpoint URL |
| Request Method | GET, POST, PUT, DELETE |
| Headers | Required headers from API documentation |
| Body | Request payload |
### Steps:
1. Click on **Add New Tool**
2. Enter the following details:
| Field | Description |
| :-------------------- | :-------------------------------------------- |
| Action Name | Name of the action (e.g., Reschedule Booking) |
| Description(Optional) | What the action does |
| Endpoint URL | API endpoint URL |
| Request Method | GET, POST, PUT, DELETE |
| Headers | Required headers from API documentation |
| Body | Request payload |
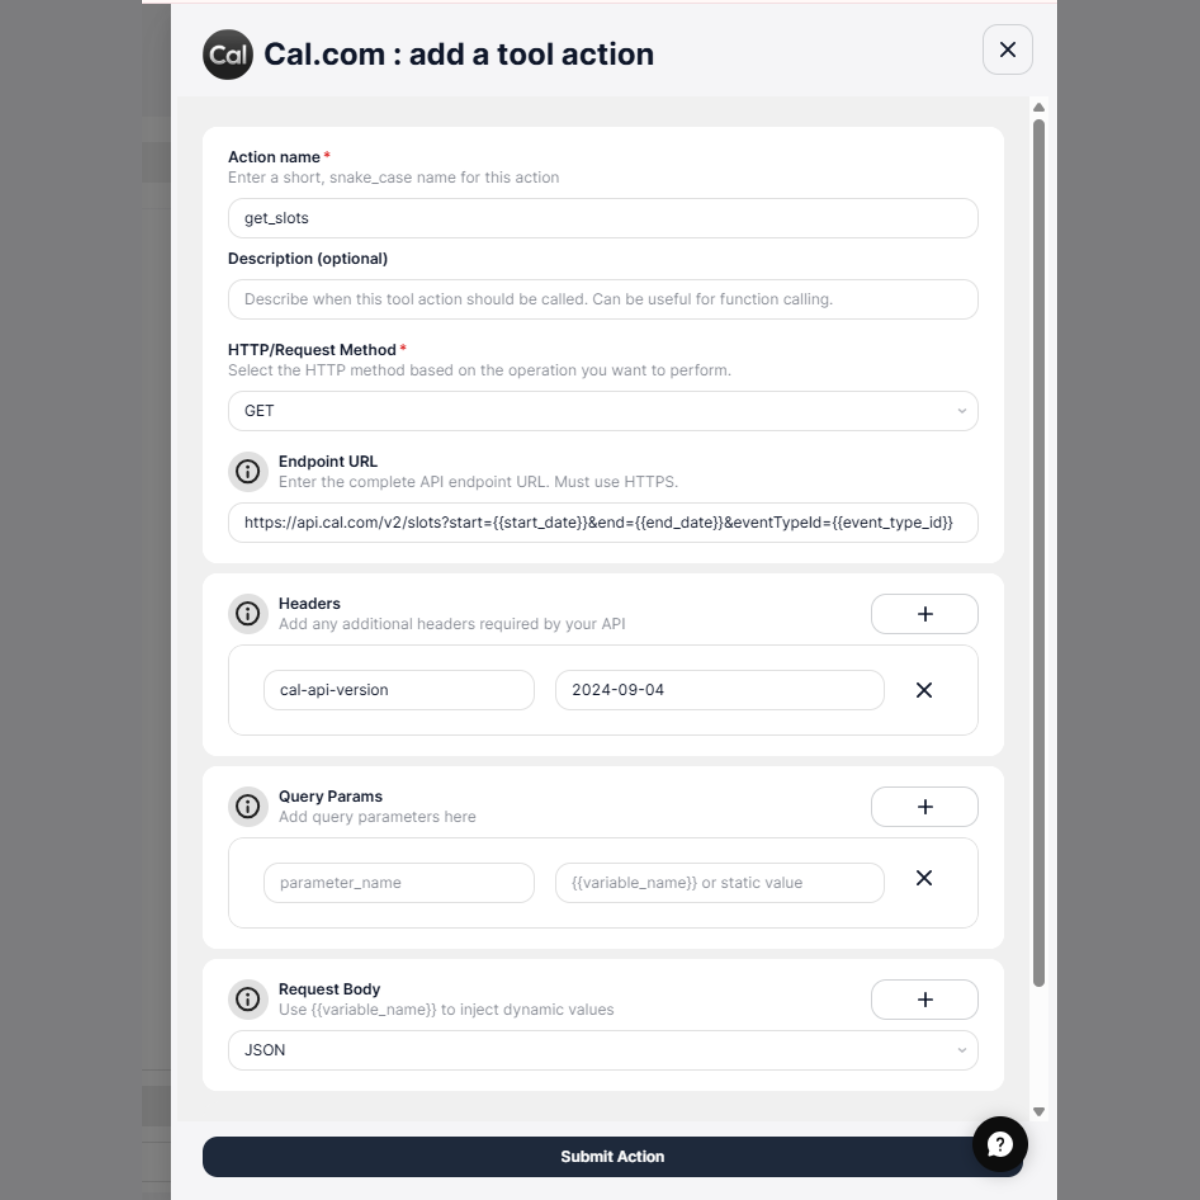 ## Tool Name
**Definition:**\
A unique identifier for the tool action. The agent uses this name internally to trigger the correct API call.
**Requirements:**
* Must be unique
* Use snake\_case format
* No spaces allowed
**Example:**
```text theme={null}
reschedule_booking
```
***
## Description (Optional)
**Definition:**\
Explains when and why the agent should use this action. This helps the AI understand the correct context for calling the API.
**Example:**
```text theme={null}
Use this action to reschedule a Cal.com booking when the user provides a new date and time.
```
***
## HTTP / Request Method
**Definition:**\
Specifies the type of operation to perform on the API.
**Supported methods:**
* GET → Retrieve data
* POST → Create data
* PUT → Update data
* PATCH → Partially update data
* DELETE → Remove data
**Example:**
```text theme={null}
GET
```
***
## Endpoint URL
**Definition:**\
The API endpoint where the request will be sent. You can use input variables to dynamically insert values.
**Static example:**
```text theme={null}
https://api.cal.com/v1/bookings
```
**Dynamic example using input variable:**
```text theme={null}
https://api.cal.com/v1/bookings/{{booking_id}}
```
Here, `{{booking_id}}` will be dynamically provided by the agent.
***
## Headers
**Definition:**\
Headers provide additional information required by the API, such as authentication and content type.
**Common headers example:**
| Key | Value |
| :------------ | :------------------- |
| Content-Type | application/json |
| Authorization | Bearer access\_token |
**Example configuration:**
```text theme={null}
Content-Type: application/json
Authorization: Bearer {{access_token}}
```
***
## Query Parameters
**Definition:**\
Query parameters allow you to filter or modify the API response. These are appended to the endpoint URL.
**Example configuration:**
| Key | Value |
| :----- | :-------------- |
| status | booking\_status |
**Final request example:**
```text theme={null}
https://api.cal.com/v1/bookings?status=upcoming
```
***
## Request Body
**Definition:**\
The request body contains the data sent to the API when creating or updating resources.
You can use input variables to dynamically pass values.
## Tool Name
**Definition:**\
A unique identifier for the tool action. The agent uses this name internally to trigger the correct API call.
**Requirements:**
* Must be unique
* Use snake\_case format
* No spaces allowed
**Example:**
```text theme={null}
reschedule_booking
```
***
## Description (Optional)
**Definition:**\
Explains when and why the agent should use this action. This helps the AI understand the correct context for calling the API.
**Example:**
```text theme={null}
Use this action to reschedule a Cal.com booking when the user provides a new date and time.
```
***
## HTTP / Request Method
**Definition:**\
Specifies the type of operation to perform on the API.
**Supported methods:**
* GET → Retrieve data
* POST → Create data
* PUT → Update data
* PATCH → Partially update data
* DELETE → Remove data
**Example:**
```text theme={null}
GET
```
***
## Endpoint URL
**Definition:**\
The API endpoint where the request will be sent. You can use input variables to dynamically insert values.
**Static example:**
```text theme={null}
https://api.cal.com/v1/bookings
```
**Dynamic example using input variable:**
```text theme={null}
https://api.cal.com/v1/bookings/{{booking_id}}
```
Here, `{{booking_id}}` will be dynamically provided by the agent.
***
## Headers
**Definition:**\
Headers provide additional information required by the API, such as authentication and content type.
**Common headers example:**
| Key | Value |
| :------------ | :------------------- |
| Content-Type | application/json |
| Authorization | Bearer access\_token |
**Example configuration:**
```text theme={null}
Content-Type: application/json
Authorization: Bearer {{access_token}}
```
***
## Query Parameters
**Definition:**\
Query parameters allow you to filter or modify the API response. These are appended to the endpoint URL.
**Example configuration:**
| Key | Value |
| :----- | :-------------- |
| status | booking\_status |
**Final request example:**
```text theme={null}
https://api.cal.com/v1/bookings?status=upcoming
```
***
## Request Body
**Definition:**\
The request body contains the data sent to the API when creating or updating resources.
You can use input variables to dynamically pass values.
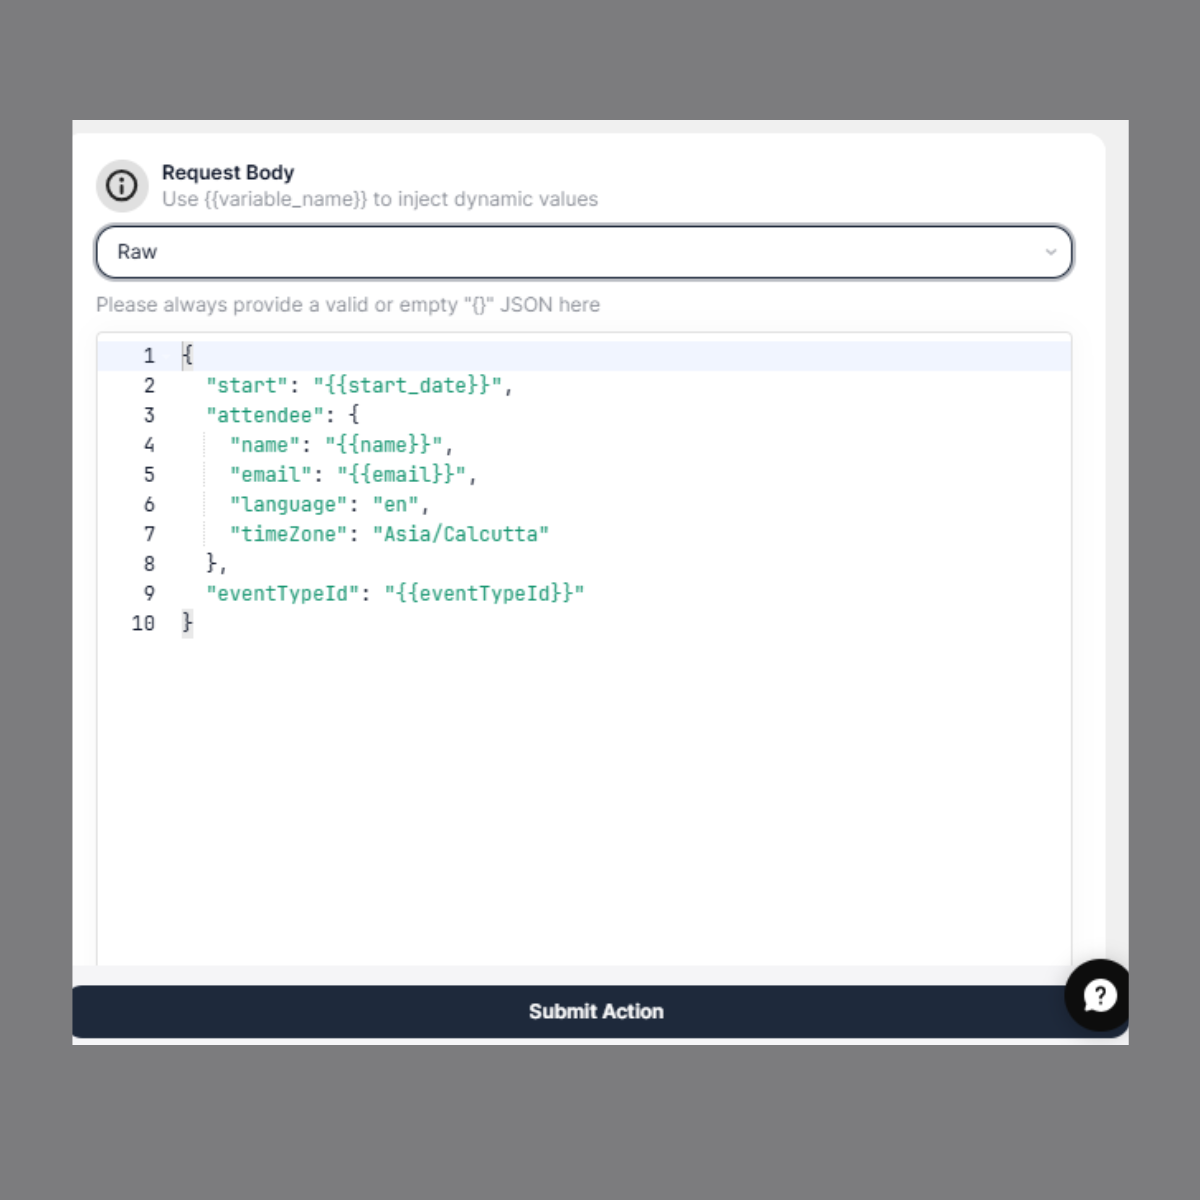 **Example:**
```text theme={null}
{
"start": "{{start_time}}",
"end": "{{end_time}}",
"eventTypeId": "{{event_type_id}}",
"reason": "User requested reschedule"
}
```
***
## Input Variables (Dynamic Placeholders)
Input variables are **dynamic placeholders** written inside double curly braces.
Format:
```text theme={null}
{{variable_name}}
```
These placeholders are replaced with real values **when the agent executes the API request during a conversation**.
The agent determines these values using:
* User input
* Conversation context
* Extracted variables configured in the agent workflow
* Agent configuration
**Examples:**
```text theme={null}
{{booking_id}}
{{start_time}}
{{end_time}}
{{event_type_id}}
{{email}}
```
**Input variables can be used in:**
* Endpoint URL
* Query Parameters
* Request Body
***
## Complete Example: Reschedule Booking (Cal .com)
**Action Name**
```text theme={null}
reschedule_booking
```
**Method**
```text theme={null}
POST
```
**Endpoint URL**
```text theme={null}
https://api.cal.com/v1/bookings/{{booking_id}}/reschedule
```
**Headers**
```text theme={null}
Content-Type: application/json
Authorization: Bearer {{access_token}}
```
## How Input Variables Work
### Conversation Example:
User: I want to reschedule my appointment for tomorrow at 10 AM.
### What SigmaMind AI does:
1. Extracts values from conversation
2. Maps values to variables
3. Replaces variables in the API body
4. Calls the API automatically
### Final API Request Sent:
```text theme={null}
{
"start": "2026-03-10T10:00:00Z",
"end": "2026-03-10T10:30:00Z",
"eventTypeId": "12345",
"reason": "User requested reschedule"
}
```
3. Click **Submit Action**
The action is now available for your agent.
You can add new actions to an existing integration in the App Marketplace in the same way, allowing your AI agent to perform additional operations using the connected app.
## How to Test Tool
You can test a tool action to verify that the API works correctly before using it in your agent.
**Example:**
```text theme={null}
{
"start": "{{start_time}}",
"end": "{{end_time}}",
"eventTypeId": "{{event_type_id}}",
"reason": "User requested reschedule"
}
```
***
## Input Variables (Dynamic Placeholders)
Input variables are **dynamic placeholders** written inside double curly braces.
Format:
```text theme={null}
{{variable_name}}
```
These placeholders are replaced with real values **when the agent executes the API request during a conversation**.
The agent determines these values using:
* User input
* Conversation context
* Extracted variables configured in the agent workflow
* Agent configuration
**Examples:**
```text theme={null}
{{booking_id}}
{{start_time}}
{{end_time}}
{{event_type_id}}
{{email}}
```
**Input variables can be used in:**
* Endpoint URL
* Query Parameters
* Request Body
***
## Complete Example: Reschedule Booking (Cal .com)
**Action Name**
```text theme={null}
reschedule_booking
```
**Method**
```text theme={null}
POST
```
**Endpoint URL**
```text theme={null}
https://api.cal.com/v1/bookings/{{booking_id}}/reschedule
```
**Headers**
```text theme={null}
Content-Type: application/json
Authorization: Bearer {{access_token}}
```
## How Input Variables Work
### Conversation Example:
User: I want to reschedule my appointment for tomorrow at 10 AM.
### What SigmaMind AI does:
1. Extracts values from conversation
2. Maps values to variables
3. Replaces variables in the API body
4. Calls the API automatically
### Final API Request Sent:
```text theme={null}
{
"start": "2026-03-10T10:00:00Z",
"end": "2026-03-10T10:30:00Z",
"eventTypeId": "12345",
"reason": "User requested reschedule"
}
```
3. Click **Submit Action**
The action is now available for your agent.
You can add new actions to an existing integration in the App Marketplace in the same way, allowing your AI agent to perform additional operations using the connected app.
## How to Test Tool
You can test a tool action to verify that the API works correctly before using it in your agent.
 ### Steps:
1. Go to Tool Library from the Agent Builder
2. Select the tool (for example, [Cal.com](http://Cal.com))
3. In the **Tools** section, locate the tool you want to test
4. Click the **Test** button next to the action
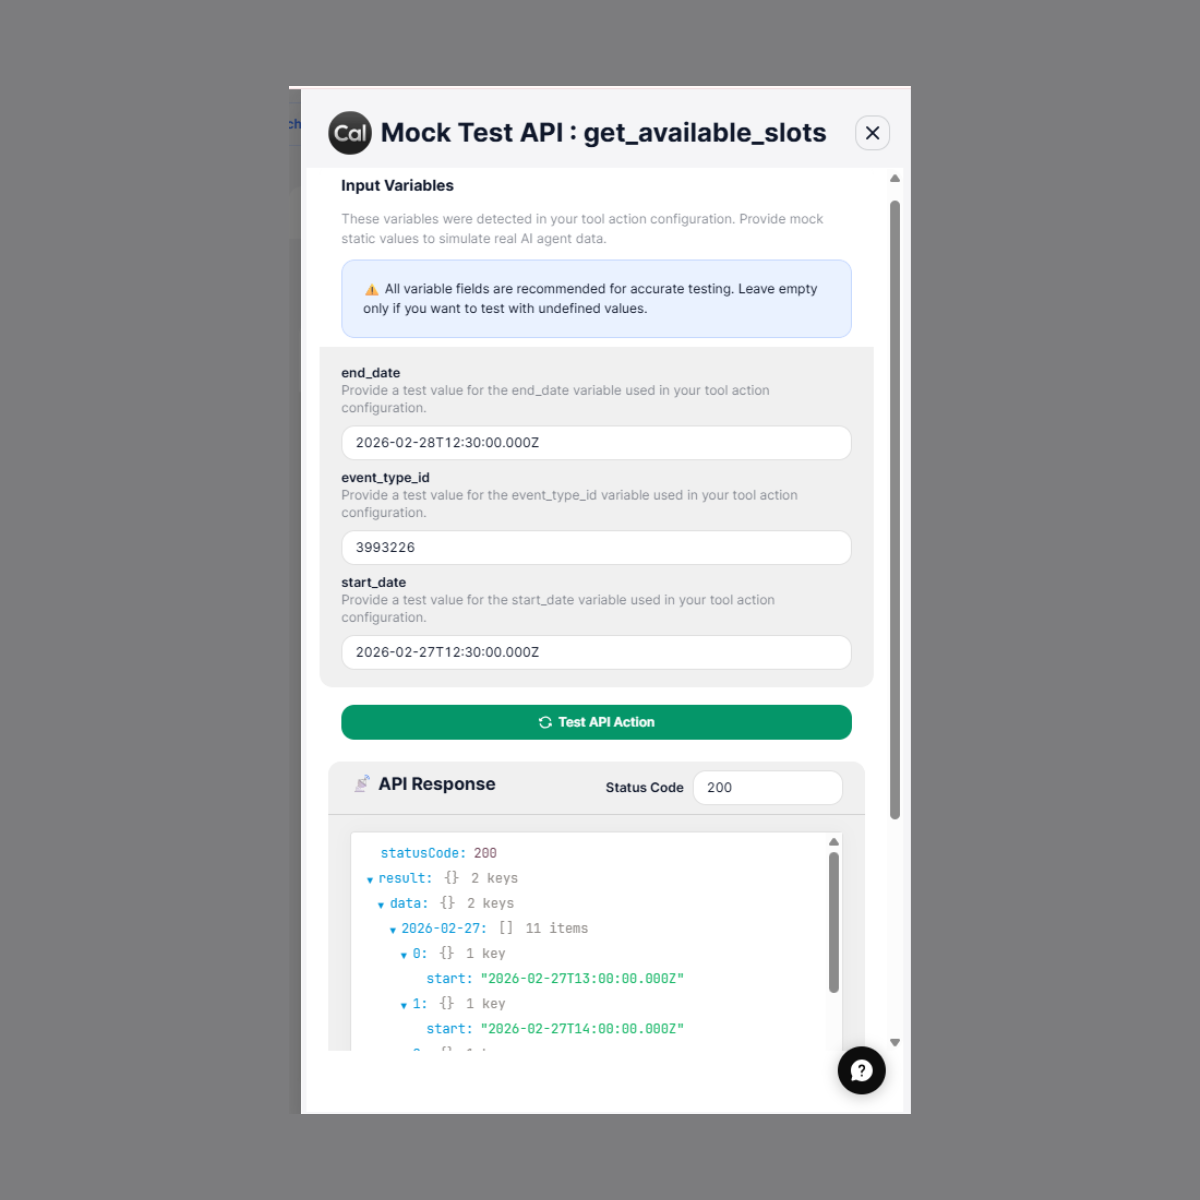
This opens the **Mock Test API** screen.
5. Enter test values for the detected input variables (such as `{{start_date}}`, `{{end_date}}`, `{{event_type_id}}`)
6. Click **Run Test**
7. Review the response to confirm the API is working correctly
### Steps:
1. Go to Tool Library from the Agent Builder
2. Select the tool (for example, [Cal.com](http://Cal.com))
3. In the **Tools** section, locate the tool you want to test
4. Click the **Test** button next to the action
This opens the **Mock Test API** screen.
5. Enter test values for the detected input variables (such as `{{start_date}}`, `{{end_date}}`, `{{event_type_id}}`)
6. Click **Run Test**
7. Review the response to confirm the API is working correctly
 ***
## Step 5: Use the Custom Tool in the Agent
After creating and testing your tool actions, you must add them to your agent. This allows the agent to call the tool during conversations and perform real-world operations.
## Method 1: Go to your Tools Section
1. Find your tool (like `get_available_slots`)
2. Click **Add to Agent**
3. Fill in the **Instructions** — describe when the AI should invoke this tool
4. Bind placeholders (if required) — see the [+Add Mapping](#add-mapping-binding-response-values-as-dynamic-variables) section below
5. Click **Add to Agent** to confirm
## Method 2: Via the Agent Builder
1. Open the **Agent Builder**
2. Click **Add Tool**
3. Click **Add Integration Tool**
4. Select the app you created or configured
5. Select the tool you want the agent to use
6. Click **Add to Agent**
***
## Step 5: Use the Custom Tool in the Agent
After creating and testing your tool actions, you must add them to your agent. This allows the agent to call the tool during conversations and perform real-world operations.
## Method 1: Go to your Tools Section
1. Find your tool (like `get_available_slots`)
2. Click **Add to Agent**
3. Fill in the **Instructions** — describe when the AI should invoke this tool
4. Bind placeholders (if required) — see the [+Add Mapping](#add-mapping-binding-response-values-as-dynamic-variables) section below
5. Click **Add to Agent** to confirm
## Method 2: Via the Agent Builder
1. Open the **Agent Builder**
2. Click **Add Tool**
3. Click **Add Integration Tool**
4. Select the app you created or configured
5. Select the tool you want the agent to use
6. Click **Add to Agent**
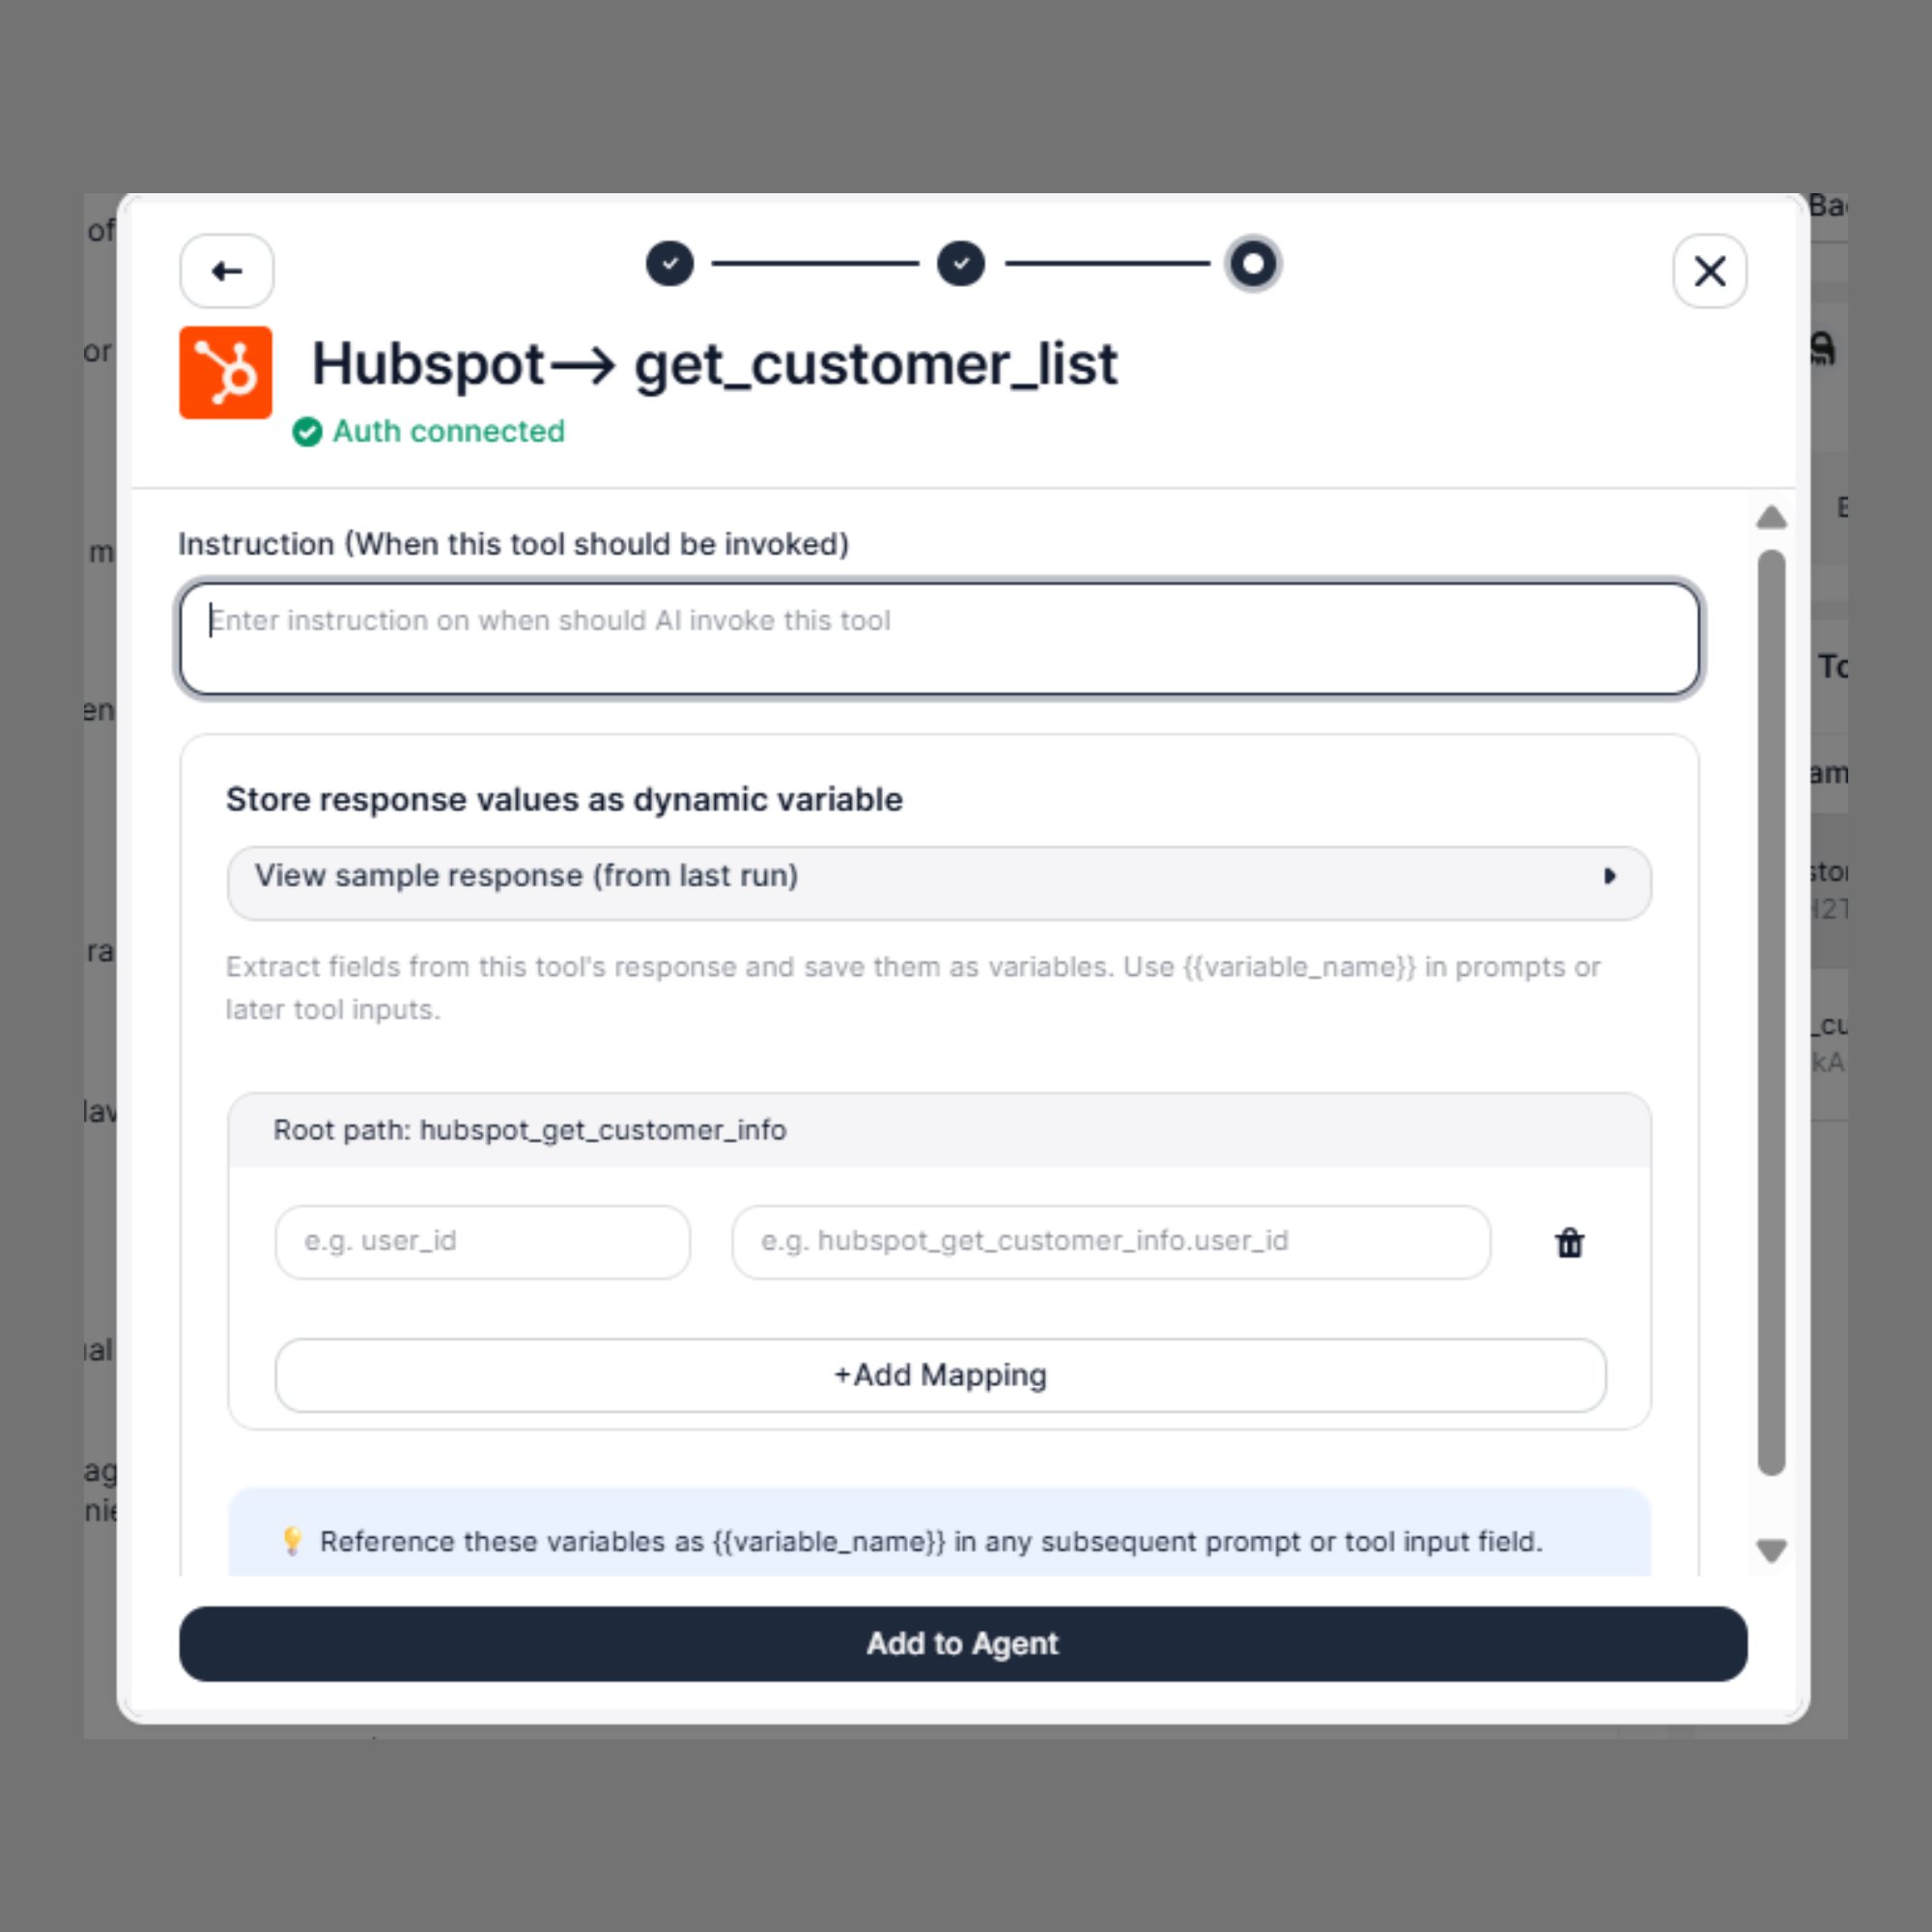 ***
## +Add Mapping: Binding Response Values as Dynamic Variables
The **+Add Mapping** feature lets you extract specific fields from a tool's response and save them as named variables. These variables can then be referenced in subsequent prompts or tool inputs using the `{{variable_name}}` syntax.
### Understanding the Sample Response
Click **View sample response (from last run)** to expand a live preview of the JSON returned by the tool. This helps you identify the exact field names to use when configuring mappings.
***
## +Add Mapping: Binding Response Values as Dynamic Variables
The **+Add Mapping** feature lets you extract specific fields from a tool's response and save them as named variables. These variables can then be referenced in subsequent prompts or tool inputs using the `{{variable_name}}` syntax.
### Understanding the Sample Response
Click **View sample response (from last run)** to expand a live preview of the JSON returned by the tool. This helps you identify the exact field names to use when configuring mappings.
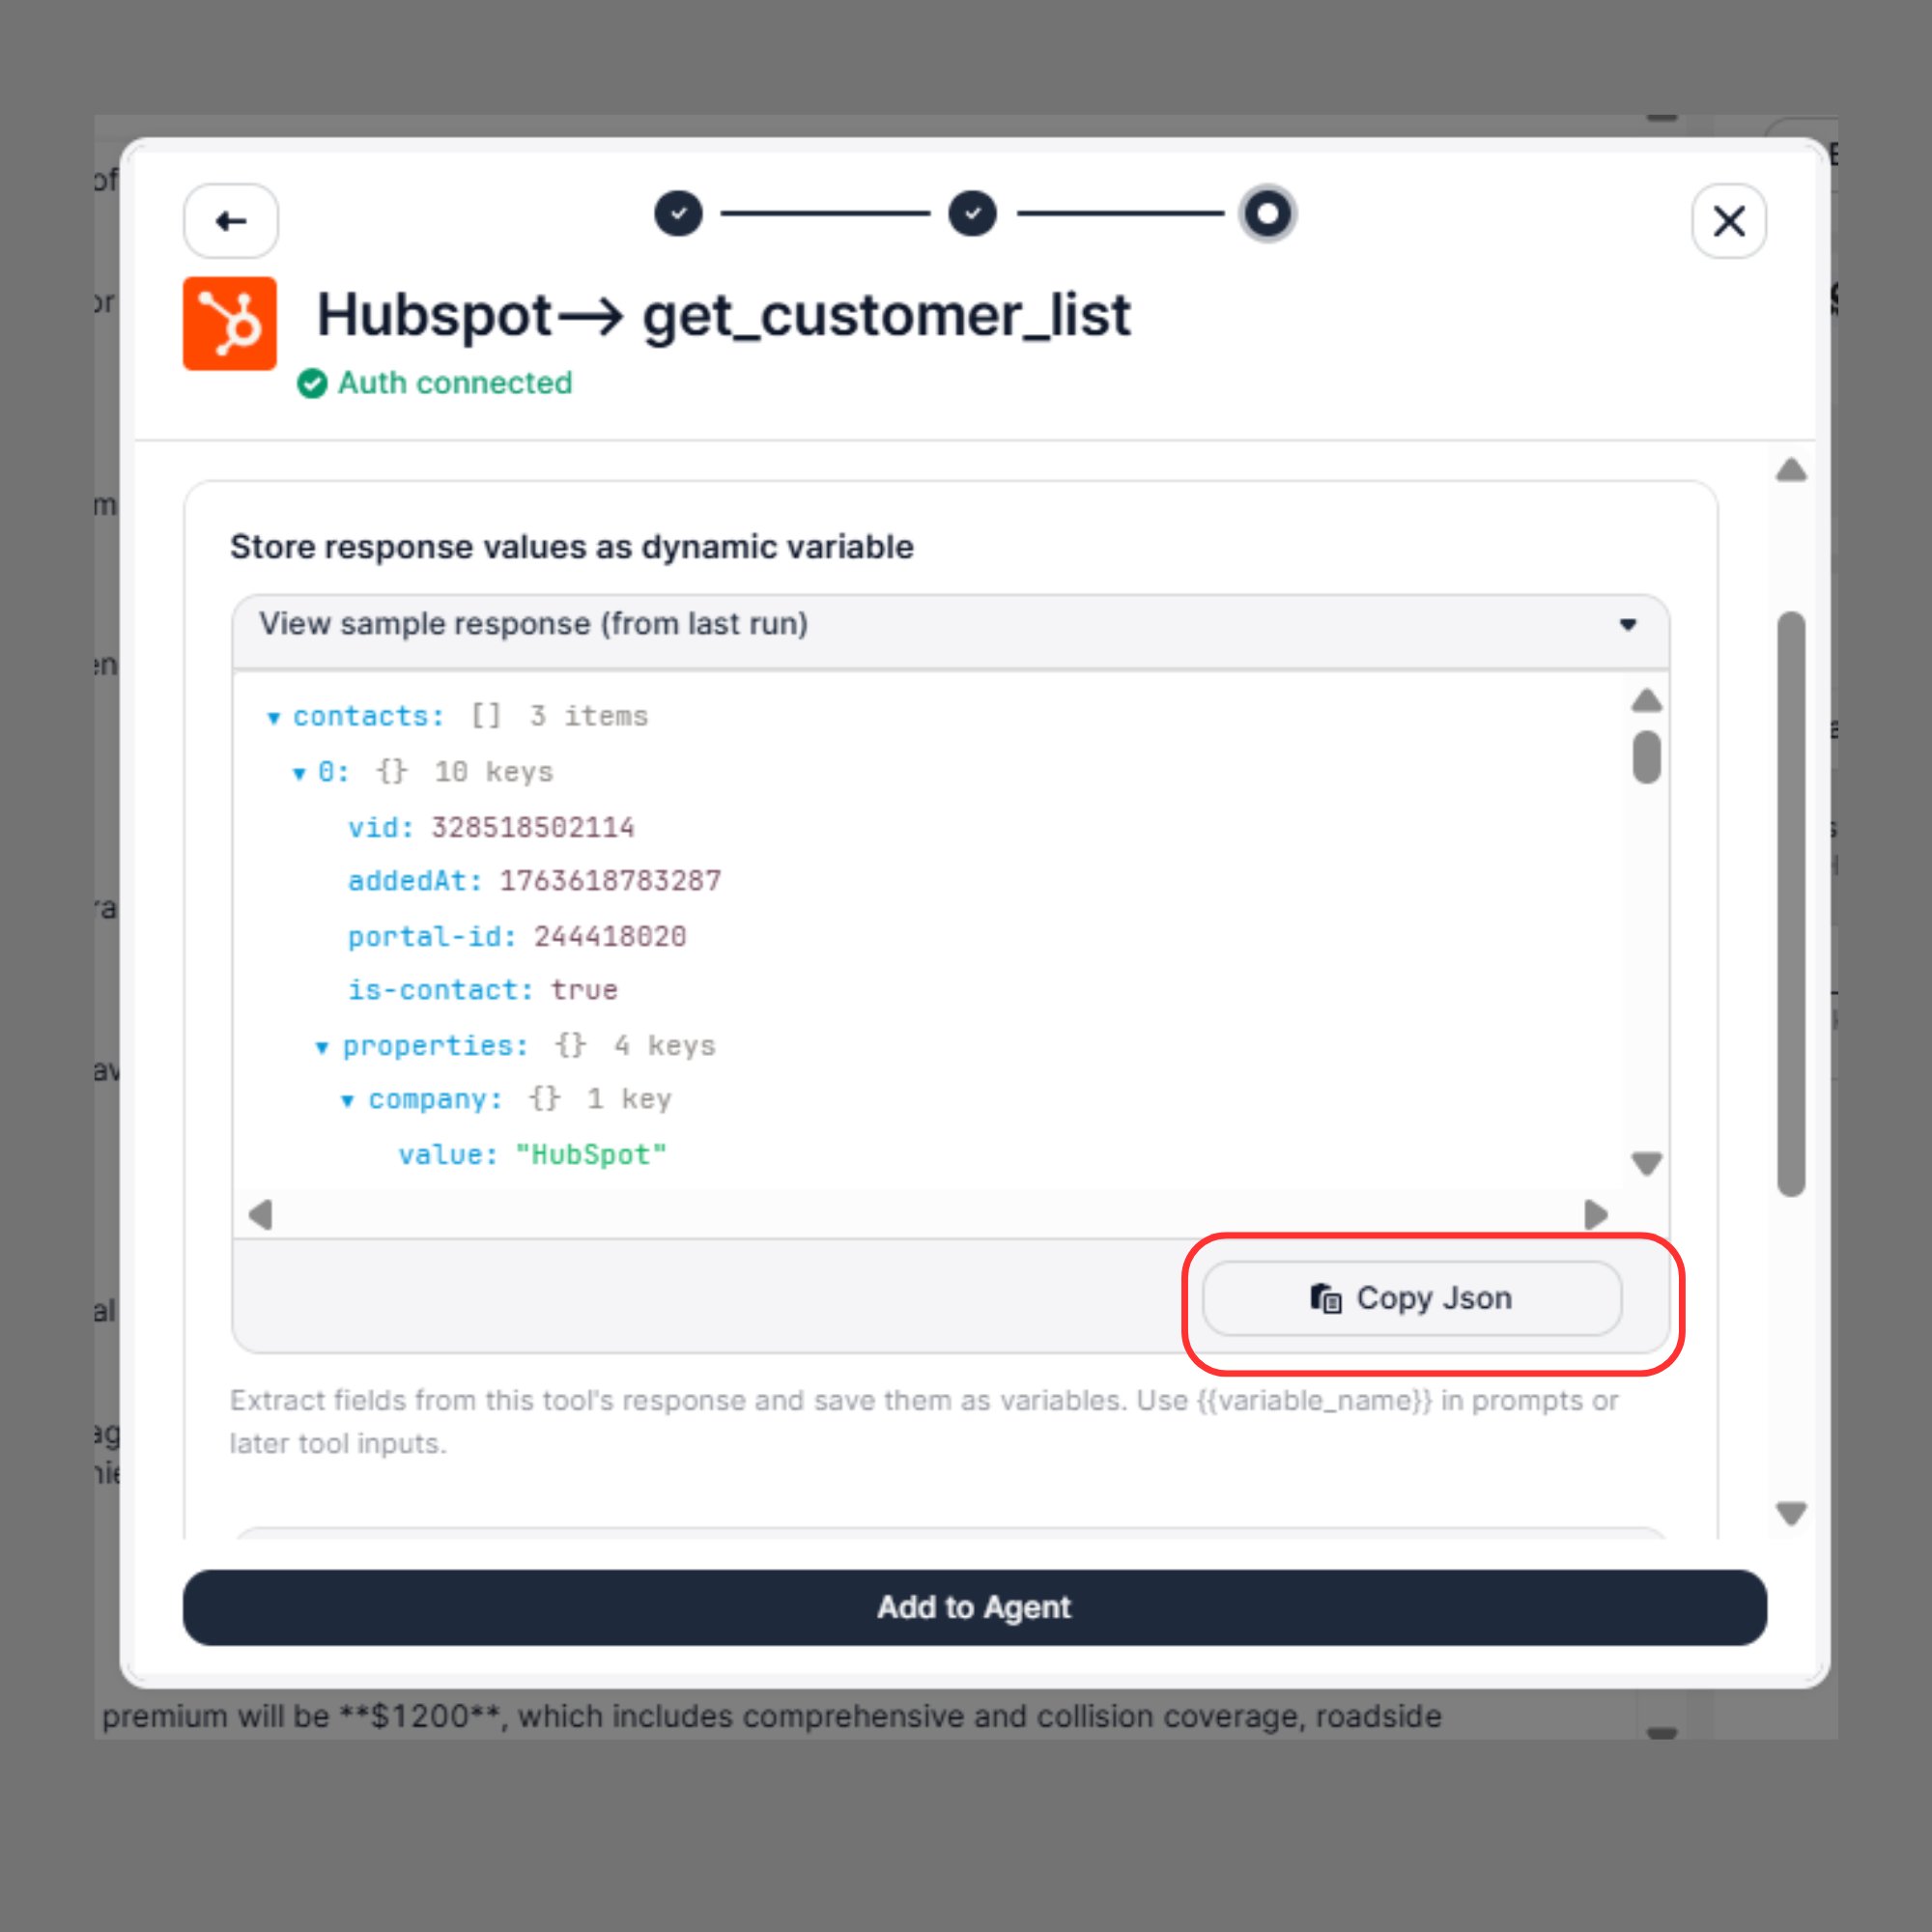 For example, the `get_customer_list` tool returns a structure like this:
```json theme={null}
{
"contacts": [
{
"vid": 3285518502114,
"addedAt": 1763618783287,
"portal-id": 244418020,
"is-contact": true,
"properties": {
"company": {
"value": "HubSpot"
}
}
}
]
}
```
Use the **Copy JSON** button inside the sample response panel to copy the full response and inspect nested fields before setting up your mappings.
To map a nested field like `company.value`, you would enter `contacts.0.properties.company.value` as the field path in the left input.
***
### How to Configure a Mapping
1. In the tool configuration panel, scroll to **Store response values as dynamic variable**
2. Confirm the **Root path** — this is auto-populated based on the tool name (e.g., `hubspot_get_customer_info`)
3. In the **left field**, enter the field name from the API response (e.g., `user_id`)
4. In the **right field**, the full variable path is auto-generated (e.g., `hubspot_get_customer_info.user_id`)
5. Click **+Add Mapping** to add more fields as needed
6. Use the 🗑 delete icon to remove any unwanted mappings
### Example Mappings for `get_customer_list`
Based on the actual sample response, here are useful field mappings you can configure:
| Field Path | Mapped Variable | Reference in Prompts |
| ------------------------------------- | -------------------------------------- | -------------------- |
| `contacts.0.vid` | `hubspot_get_customer_list.vid` | `{{vid}}` |
| `contacts.0.addedAt` | `hubspot_get_customer_list.addedAt` | `{{addedAt}}` |
| `contacts.0.portal-id` | `hubspot_get_customer_list.portal_id` | `{{portal_id}}` |
| `contacts.0.is-contact` | `hubspot_get_customer_list.is_contact` | `{{is_contact}}` |
| `contacts.0.properties.company.value` | `hubspot_get_customer_list.company` | `{{company}}` |
### Using Variables in Subsequent Steps
Once mapped, reference these variables anywhere in your agent flow:
```text theme={null}
Send an email to {{email}} with a personalized greeting.
Look up account for user ID: {{user_id}}
Pass {{company}} to the CRM update tool input field.
```
Reference these variables as `{{variable_name}}` in any subsequent prompt or tool input field.
***
## Tips & Best Practices
Click **View sample response (from last run)** before adding mappings to confirm exact field names returned by the API. If no sample is available, run the tool once from the Test panel first.
Only map fields you'll actually use in downstream steps. Unused variables add clutter without any benefit.
Ensure consistency between the mapped name and how you reference it in prompts. `{{Email}}` and `{{email}}` are treated as different variables.
The root path prefix (e.g., `hubspot_get_customer_info.`) is automatically prepended. You only need to type the leaf field name (e.g., `user_id`) in the left input field.
***
### 2. Using the API
If you prefer programmatic control, use the [**Integration Tools API**](https://docs.sigmamind.ai/api-reference/integration-tools/create-tool) to create a tool.
### **Field descriptions**
| **Field** | **Required** | **Description** |
| :---------- | :----------- | :----------------------------------------------------------------------------------------------- |
| name | **required** | Unique name for the tool within this integration (e.g. `get-customer`) |
| description | **required** | Natural language description of what the tool does — agents use this to decide when to invoke it |
| method | **required** | HTTP method: `GET`, `POST`, `PATCH`, `PUT`, or `DELETE` |
| url | **required** | Full endpoint URL the tool will call (e.g. `https://api.stripe.com/v1/customers/{id}`) |
| queryParams | **optional** | Array of query parameter definitions — each with `key`, `value`, and `description` |
| bodyParams | **optional** | Object describing the request body schema — used for `POST` / `PATCH` / `PUT` requests |
| headers | **optional** | Array of custom headers to include with every call from this tool, each with `key` and `value` |
```json Add New Tool theme={null}
curl --request POST \
--url https://api.sigmamind.ai/v1/integrations/{integrationId}/tools \
--header 'Content-Type: application/json' \
--header 'X-API-Key: ' \
--data '{
"name": "get-customer",
"description": "Retrieves a customer record by ID from Stripe",
"method": "GET",
"url": "https://api.stripe.com/v1/customers/{customerId}",
"queryParams": [
{
"key": "expand[]",
"value": "subscriptions",
"description": "Expand nested subscription data"
}
],
"headers": [
{
"key": "Stripe-Version",
"value": "2023-10-16"
}
]
}'
```
Example Agent Workflow
1. User: I want to reschedule my appointment
2. Agent collects the required information
3. Agent calls Reschedule Booking action
4. API processes the request
5. Agent confirms the reschedule
Authentication failing: Verify credentials and authentication type
API request failing: Test API action and verify endpoint and headers
***
## Best Practices
* Always follow the API documentation of the external app
* Use clear variable names
* Test actions before enabling
* Configure authentication properly
* Use descriptive action names
For example, the `get_customer_list` tool returns a structure like this:
```json theme={null}
{
"contacts": [
{
"vid": 3285518502114,
"addedAt": 1763618783287,
"portal-id": 244418020,
"is-contact": true,
"properties": {
"company": {
"value": "HubSpot"
}
}
}
]
}
```
Use the **Copy JSON** button inside the sample response panel to copy the full response and inspect nested fields before setting up your mappings.
To map a nested field like `company.value`, you would enter `contacts.0.properties.company.value` as the field path in the left input.
***
### How to Configure a Mapping
1. In the tool configuration panel, scroll to **Store response values as dynamic variable**
2. Confirm the **Root path** — this is auto-populated based on the tool name (e.g., `hubspot_get_customer_info`)
3. In the **left field**, enter the field name from the API response (e.g., `user_id`)
4. In the **right field**, the full variable path is auto-generated (e.g., `hubspot_get_customer_info.user_id`)
5. Click **+Add Mapping** to add more fields as needed
6. Use the 🗑 delete icon to remove any unwanted mappings
### Example Mappings for `get_customer_list`
Based on the actual sample response, here are useful field mappings you can configure:
| Field Path | Mapped Variable | Reference in Prompts |
| ------------------------------------- | -------------------------------------- | -------------------- |
| `contacts.0.vid` | `hubspot_get_customer_list.vid` | `{{vid}}` |
| `contacts.0.addedAt` | `hubspot_get_customer_list.addedAt` | `{{addedAt}}` |
| `contacts.0.portal-id` | `hubspot_get_customer_list.portal_id` | `{{portal_id}}` |
| `contacts.0.is-contact` | `hubspot_get_customer_list.is_contact` | `{{is_contact}}` |
| `contacts.0.properties.company.value` | `hubspot_get_customer_list.company` | `{{company}}` |
### Using Variables in Subsequent Steps
Once mapped, reference these variables anywhere in your agent flow:
```text theme={null}
Send an email to {{email}} with a personalized greeting.
Look up account for user ID: {{user_id}}
Pass {{company}} to the CRM update tool input field.
```
Reference these variables as `{{variable_name}}` in any subsequent prompt or tool input field.
***
## Tips & Best Practices
Click **View sample response (from last run)** before adding mappings to confirm exact field names returned by the API. If no sample is available, run the tool once from the Test panel first.
Only map fields you'll actually use in downstream steps. Unused variables add clutter without any benefit.
Ensure consistency between the mapped name and how you reference it in prompts. `{{Email}}` and `{{email}}` are treated as different variables.
The root path prefix (e.g., `hubspot_get_customer_info.`) is automatically prepended. You only need to type the leaf field name (e.g., `user_id`) in the left input field.
***
### 2. Using the API
If you prefer programmatic control, use the [**Integration Tools API**](https://docs.sigmamind.ai/api-reference/integration-tools/create-tool) to create a tool.
### **Field descriptions**
| **Field** | **Required** | **Description** |
| :---------- | :----------- | :----------------------------------------------------------------------------------------------- |
| name | **required** | Unique name for the tool within this integration (e.g. `get-customer`) |
| description | **required** | Natural language description of what the tool does — agents use this to decide when to invoke it |
| method | **required** | HTTP method: `GET`, `POST`, `PATCH`, `PUT`, or `DELETE` |
| url | **required** | Full endpoint URL the tool will call (e.g. `https://api.stripe.com/v1/customers/{id}`) |
| queryParams | **optional** | Array of query parameter definitions — each with `key`, `value`, and `description` |
| bodyParams | **optional** | Object describing the request body schema — used for `POST` / `PATCH` / `PUT` requests |
| headers | **optional** | Array of custom headers to include with every call from this tool, each with `key` and `value` |
```json Add New Tool theme={null}
curl --request POST \
--url https://api.sigmamind.ai/v1/integrations/{integrationId}/tools \
--header 'Content-Type: application/json' \
--header 'X-API-Key: ' \
--data '{
"name": "get-customer",
"description": "Retrieves a customer record by ID from Stripe",
"method": "GET",
"url": "https://api.stripe.com/v1/customers/{customerId}",
"queryParams": [
{
"key": "expand[]",
"value": "subscriptions",
"description": "Expand nested subscription data"
}
],
"headers": [
{
"key": "Stripe-Version",
"value": "2023-10-16"
}
]
}'
```
Example Agent Workflow
1. User: I want to reschedule my appointment
2. Agent collects the required information
3. Agent calls Reschedule Booking action
4. API processes the request
5. Agent confirms the reschedule
Authentication failing: Verify credentials and authentication type
API request failing: Test API action and verify endpoint and headers
***
## Best Practices
* Always follow the API documentation of the external app
* Use clear variable names
* Test actions before enabling
* Configure authentication properly
* Use descriptive action names